When I first decided to set up a gaming server for my friends, I thought it would be simple—just buy some hardware and install the game, right? Wrong. After plenty of trial and error, I’ve learned what actually works. This guide will walk you through building a gaming server that performs well without the fluff.
Why Build Your Own Gaming Server?
Control is everything. You decide the rules, mods, player list, and every aspect of gameplay. No more dealing with abusive admins or servers that disappear overnight.
Performance matters. A properly configured server offers better performance than overcrowded public servers. Plus, you can host it closer to your player base for lower latency.
Cost savings add up. While the initial investment seems high, hosting your own server beats paying monthly fees for years, especially if you run multiple game servers.
What You Actually Need
Not all games need the same resources. Here’s what I’ve learned:
Quick Hardware Guide
CPU: Single-thread performance matters more than core count. Intel i7/i9 or AMD Ryzen 7/9 with 3.5GHz+ clock speeds work great.
RAM Requirements:
- Minecraft: 4-8GB (vanilla), 16GB+ (heavily modded)
- Rust: 10-16GB
- CS2: 4-8GB
- ARK: 16GB minimum
- Valheim: 4-8GB
Storage: SSDs are non-negotiable. NVMe is ideal, but even SATA SSDs dramatically improve load times. Plan for at least 500GB, though 1TB is better.
Self-Hosted vs. Cloud: Which Path?
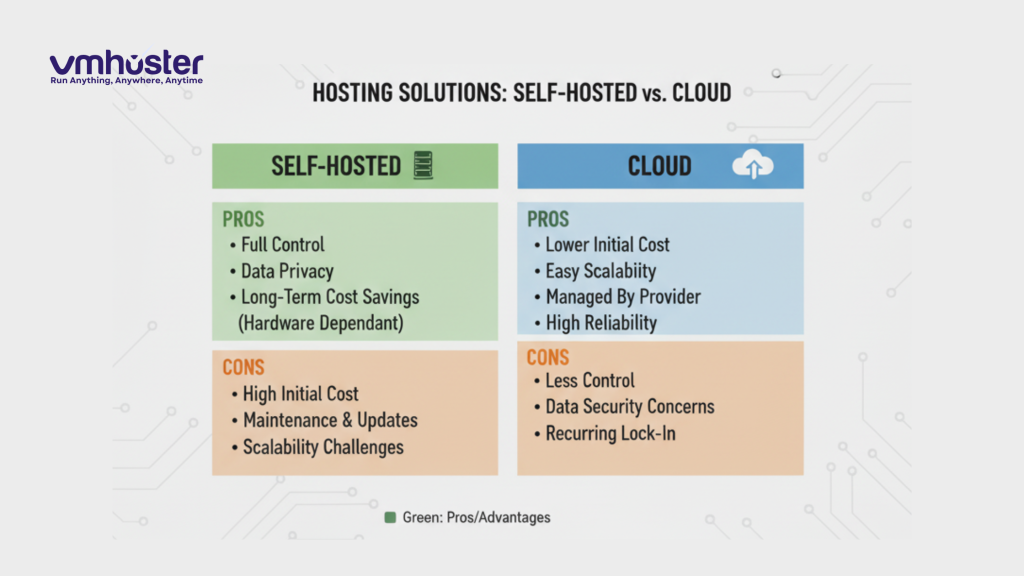
Physical Server Build
I went this route because I wanted complete control.
Pros: One-time cost, complete control, no monthly fees Cons: Requires good internet upload speeds, you handle all maintenance, power costs
Cloud Hosting
After two years of self-hosting, I moved some servers to the cloud.
Pros: Professional network, instant scalability, minimal downtime Cons: Recurring costs, less hardware control
For most people starting out, cloud hosting from providers like VMhoster is honestly easier. You can always migrate to self-hosted later.
Building Your Server: Component List
Here’s my proven build for running multiple game servers:
- CPU: Intel Core i7-13700K or AMD Ryzen 7 7700X
- Motherboard: Any B660/B760 (Intel) or B650 (AMD) with good reviews
- RAM: 32GB (2x16GB) DDR4/DDR5
- Storage: 1TB NVMe SSD + 2TB backup drive
- PSU: 650W 80+ Gold (Corsair RM650x is solid)
- Case: Focus on airflow—Fractal Define 7 or similar
- Cooling: Noctua NH-D15 or equivalent AIO
Total cost: Around $1,000-1,200

Operating System: Linux vs. Windows
Linux (Ubuntu Server 22.04 LTS)
Why I use it:
- Uses way less resources
- More stable for 24/7 operation
- Free and better with SteamCMD
- Most game servers run better on Linux
The catch: Command-line learning curve, but DigitalOcean’s tutorials helped me immensely.
Windows Server/11 Pro
When to use it:
- Games that only support Windows
- You prefer a GUI
- Remote Desktop is easier for you
Downside: Licensing costs ($100+) and higher resource usage.
Network Setup (The Critical Part)
This is where most self-hosted servers fail. Here’s the essential checklist:
1. Static IP Assignment
Set a DHCP reservation in your router for your server (e.g., 192.168.1.100). This keeps the IP consistent.
2. Port Forwarding
Each game needs specific ports open:
- Minecraft: 25565 (TCP)
- CS2: 27015-27030 (TCP/UDP)
- Rust: 28015-28016 (TCP/UDP)
- Valheim: 2456-2458 (UDP)
Log into your router, find “Port Forwarding,” and create rules pointing these ports to your server’s static IP.
3. Dynamic DNS
Your home IP changes. Use a free DDNS service like No-IP so players can connect using a hostname (myserver.ddns.net) instead of remembering IP addresses.
4. Firewall Configuration
Linux (UFW):
bash
sudo ufw enable
sudo ufw allow 22/tcp  # SSH
sudo ufw allow 25565/tcp  # Minecraft
Windows: Create inbound rules in Windows Defender Firewall for each game port.
Installing Game Servers
Minecraft Server (Linux)
bash
sudo apt update && sudo apt upgrade -y
sudo apt install openjdk-17-jre-headless -y

mkdir ~/minecraft && cd ~/minecraft
wget https://launcher.mojang.com/v1/objects/[version]/server.jar

java -Xmx4G -Xms4G -jar server.jar nogui

# Edit eula.txt to accept terms
nano eula.txt  # Change false to true

# Start server
java -Xmx4G -Xms4G -jar server.jar nogui
Valheim Server (Linux)
bash
sudo apt install steamcmd -y

steamcmd
login anonymous
force_install_dir /home/user/valheim
app_update 896660 validate
quit

cd /home/user/valheim
./valheim_server.x86_64 -name "My Server" -port 2456 -world "World1" -password "pass123"
CS2 Server (Linux)
bash
mkdir ~/cs2
steamcmd +login anonymous +force_install_dir ~/cs2 +app_update 730 validate +quit

cd ~/cs2
./srcds_run -game csgo +game_type 0 +game_mode 1 +map de_dust2
Get a Game Server Login Token from Steam’s GSLT page.
Essential Server Management
Keep Servers Running with Screen
bash
# Start server in detached session
screen -S minecraft
java -Xmx4G -Xms4G -jar server.jar nogui

# Detach: Ctrl+A then D
# Reattach later: screen -r minecraft
Automatic Backups
Create a backup script:
bash
#!/bin/bash
tar -czf ~/backups/minecraft_$(date +%Y%m%d).tar.gz ~/minecraft/world
find ~/backups -name "minecraft_*.tar.gz" -mtime +7 -delete
Schedule daily at 4 AM:
bash
crontab -e
# Add: 0 4 * * * /home/user/backup.sh
Auto-Restarts
Schedule weekly restarts to prevent memory leaks:
bash
# restart.sh
screen -S minecraft -X quit
sleep 10
screen -dmS minecraft java -Xmx4G -Xms4G -jar ~/minecraft/server.jar nogui
bash
crontab -e
# Add: 0 3 * * 0 /home/user/restart.sh
Security Essentials
1. SSH Keys Only (Linux)
bash
ssh-keygen -t ed25519
ssh-copy-id user@server-ip

# Disable password auth
sudo nano /etc/ssh/sshd_config
# Set: PasswordAuthentication no
sudo systemctl restart sshd
2. Install Fail2Ban
bash
sudo apt install fail2ban -y
sudo systemctl enable fail2ban
3. Regular Updates
bash
sudo apt update && sudo apt upgrade -y # Weekly4. Game-Specific Security
- Enable whitelists where possible
- Use strong RCON passwords
- Never run servers as root
- Review admin lists regularly
Troubleshooting Common Problems
Server Won’t Start
- Check logs:
cat logs/latest.log - Verify port availability:
sudo lsof -i :25565 - Check RAM allocation isn’t too high
Players Can’t Connect
- Test ports at portchecker.co
- Temporarily disable firewall to test
- Try connecting locally first (192.168.x.x)
- Verify DDNS is updating
Lag Issues
- Check server TPS/performance
- Reduce view distance
- Limit entity counts
- Monitor with
htopfor resource bottlenecks
Cost Breakdown
Self-Hosted
- Hardware: ~$1,050 one-time
- Electricity: $15-20/month
- Break-even: ~3 years vs. cloud hosting
Cloud Hosting (VMhoster example)
- 4GB server: $15-25/month
- 8GB server: $25-40/month
- 16GB server: $45-70/month
Cloud makes sense for short-term or if you want zero maintenance. Self-hosting saves money long-term if you’re committed.
Key Takeaways
✅ Match hardware to your game’s specific needs ✅ Network configuration is critical—test everything ✅ Automate backups and restarts from day one ✅ Security isn’t optional ✅ Start with one game server and expand gradually
The reality: Your first server will have problems. Mine crashed constantly for the first week. But each issue teaches you something valuable. Start small, test thoroughly, and don’t be afraid to ask for help in game-specific communities.
Helpful Resources
- LinuxGSM – Automated game server installation scripts
- DigitalOcean Tutorials – Excellent Linux guides
- r/admincraft – Minecraft server admin community
- VMhoster – Professional managed game server hosting
Need managed hosting instead? Check out VMhoster’s gaming server solutions for professional hosting that handles the technical details while giving you full control.
This guide is based on three years of running gaming servers for communities from 10 to 200+ players. All recommendations come from real-world experience.