
I’ll be honest—the first time I encountered the DNS_PROBE_FINISHED_NXDOMAIN error, I thought my internet connection had completely given up on me. The message looked cryptic, and I had no idea where to start. If you’re reading this, you’re probably in the same boat, staring at your screen wondering why you can’t access a website that was working perfectly fine just moments ago.
Don’t worry—I’ve been there, and I’m going to walk you through exactly how to fix this frustrating error, step by step.
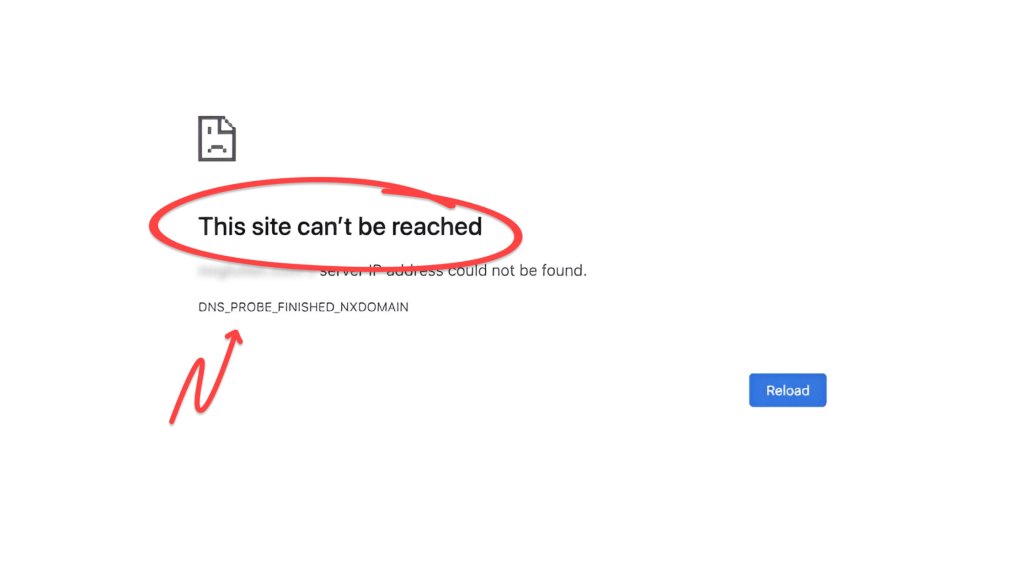
What Does DNS_PROBE_FINISHED_NXDOMAIN Actually Mean?
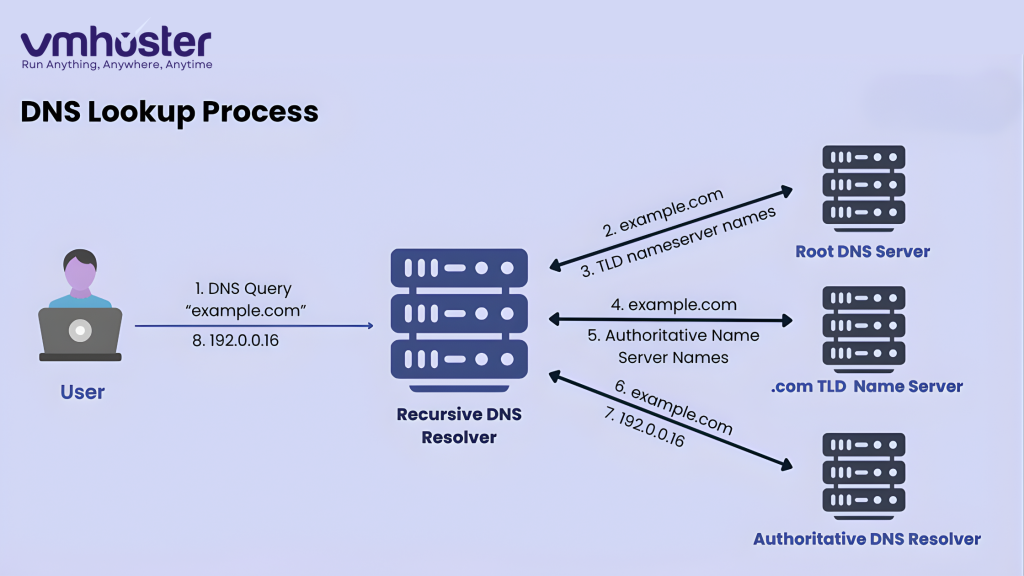
Before we dive into solutions, let’s break down what this error is actually telling you. DNS stands for Domain Name System—it’s basically the internet’s phone book. When you type a website address like “vmhoster.com” into your browser, DNS servers translate that human-readable domain into an IP address that computers understand.
The NXDOMAIN part? It stands for “Non-Existent Domain.” Essentially, your browser is saying: “Hey, I tried to find this website, but the DNS server is telling me it doesn’t exist.”Now, this doesn’t always mean the website is actually gone. More often than not, it’s a problem on your end—with your DNS settings, cache, or network configuration. Sometimes it could be your hosting provider having issues (which is where a reliable VPS hosting service becomes crucial).
Common Causes of This DNS Error
From my experience troubleshooting this error across different devices and networks, here are the usual suspects:
- Corrupted DNS cache on your computer or browser
- Incorrect DNS server settings (often happens after network changes)
- Firewall or antivirus interference blocking DNS requests
- Router configuration issues that need a simple reset
- Problems with your ISP’s DNS servers (yes, this happens more than you’d think)
- Domain registration issues if you own the website
- Recent changes to your hosting configuration
Method 1: Clear Your DNS Cache (Start Here)
This is the quickest fix and solves the problem about 60% of the time in my experience. Your computer stores DNS information to speed up browsing, but sometimes this cache gets corrupted or outdated.
For Windows Users:
- Press Windows + R to open the Run dialog
- Type cmd and press Enter
- In the Command Prompt, type: ipconfig /flushdns
- Press Enter and wait for the confirmation message
- Also run: ipconfig /renew to refresh your IP address
For Mac Users:
- Open Terminal (find it in Applications > Utilities)
- Type the following command based on your macOS version:
- macOS 12 (Monterey) and later: sudo dscacheutil -flushcache; sudo killall -HUP mDNSResponder
- macOS 11 (Big Sur): sudo dscacheutil -flushcache; sudo killall -HUP mDNSResponder
- Enter your admin password when prompted
- Restart your browser
For Linux/Ubuntu:
bash
sudo systemd-resolve –flush-caches
# or for older systems
sudo /etc/init.d/nscd restart
“`
After flushing your DNS cache, try accessing the website again. If it still doesn’t work, move on to the next method.
## Method 2: Change Your DNS Servers (My Go-To Solution)
Your ISP’s DNS servers might be slow, unreliable, or temporarily down. Switching to public DNS servers like Google DNS or Cloudflare DNS has solved this issue for me countless times.
### Using Google DNS:
**For Windows:**
1. Open **Control Panel** > **Network and Internet** > **Network and Sharing Center**
2. Click on your active connection (Wi-Fi or Ethernet)
3. Click **Properties** > Select **Internet Protocol Version 4 (TCP/IPv4)**
4. Click **Properties** again
5. Select **Use the following DNS server addresses**
6. Enter:
– **Preferred DNS**: `8.8.8.8`
– **Alternate DNS**: `8.8.4.4`
7. Click **OK** and restart your browser
**For Mac:**
1. Go to **System Settings** > **Network**
2. Select your active connection and click **Advanced**
3. Go to the **DNS** tab
4. Click the **+** button and add:
– `8.8.8.8`
– `8.8.4.4`
5. Click **OK** and **Apply**
### Using Cloudflare DNS (Faster in My Tests):
Follow the same steps above, but use these DNS addresses instead:
– **Preferred DNS**: `1.1.1.1`
– **Alternate DNS**: `1.0.0.1`
I’ve found Cloudflare DNS to be slightly faster than Google DNS, especially for international websites. Check out [Cloudflare’s official setup guide](https://1.1.1.1/dns/) for more details.
## Method 3: Clear Your Browser Cache and Cookies
Sometimes the issue isn’t with your system DNS but with your browser’s own cache. Here’s how to clear it:
### Google Chrome:
1. Press **Ctrl + Shift + Delete** (Windows) or **Cmd + Shift + Delete** (Mac)
2. Select **All time** from the time range
3. Check **Cookies** and **Cached images and files**
4. Click **Clear data**
### Firefox:
1. Press **Ctrl + Shift + Delete**
2. Select **Everything** from the time range
3. Check **Cookies** and **Cache**
4. Click **Clear Now**
### Safari:
1. Go to **Safari** > **Preferences** > **Privacy**
2. Click **Manage Website Data**
3. Click **Remove All**
## Method 4: Restart Your Router and Modem
I know, I know—”have you tried turning it off and on again?” sounds like cliché tech support advice. But you’d be surprised how often this actually works.
1. **Unplug your modem** (the device connected to your wall)
2. **Unplug your router** (the device that broadcasts Wi-Fi)
3. **Wait 30 seconds** (seriously, don’t rush this)
4. **Plug the modem back in first** and wait for all lights to stabilize
5. **Plug the router back in** and wait for it to fully boot up
6. Try accessing the website again
This clears your router’s DNS cache and re-establishes a fresh connection with your ISP.
## Method 5: Temporarily Disable Your Firewall/Antivirus
I discovered this one the hard way when my overly protective antivirus was blocking legitimate DNS requests. Sometimes security software can interfere with DNS lookups.
**Important**: Only disable these temporarily for testing. If this fixes the issue, you’ll need to adjust your security settings rather than leaving protection disabled.
### Windows Defender Firewall:
1. Search for **Windows Security** in the Start menu
2. Go to **Firewall & network protection**
3. Click on your active network
4. Toggle **Windows Defender Firewall** to **Off**
5. Try accessing the website
6. **Remember to turn it back on!**
If the website loads with the firewall disabled, you’ll need to add an exception for your browser or adjust the firewall rules.
## Method 6: Renew Your IP Address
Your computer might have an IP configuration issue that’s preventing proper DNS resolution.
### Windows:
“`
ipconfig /release
ipconfig /renew
ipconfig /flushdns
“`
### Mac:
“`
sudo ifconfig en0 down
sudo ifconfig en0 up
“`
### Linux:
“`
sudo dhclient -r
sudo dhclient
Method 7: Check Your Hosts File
The hosts file on your computer can override DNS settings. If someone (or some malware) has modified it, certain websites might not load.
Windows:
- Navigate to: C:\Windows\System32\drivers\etc\
- Open the hosts file with Notepad (run as Administrator)
- Look for any entries related to the website you’re trying to access
- Delete suspicious entries or add a # before them to comment them out
- Save the file
Mac/Linux:
- Open Terminal
- Type: sudo nano /etc/hosts
- Check for suspicious entries
- Use Ctrl + X to exit and save changes
A clean hosts file should only have entries like 127.0.0.1 localhost.
Method 8: Update Your Network Adapter Drivers
Outdated network drivers can cause all sorts of connectivity issues, including DNS problems.
Windows:
- Press Windows + X and select Device Manager
- Expand Network adapters
- Right-click your network adapter
- Select Update driver
- Choose Search automatically for drivers
- Restart your computer after updating
You can also visit your computer manufacturer’s website to download the latest drivers directly.
Method 9: Reset Chrome’s DNS Settings (Chrome-Specific Fix)
Chrome has its own DNS caching system that sometimes needs clearing:
- Type chrome://net-internals/#dns in your address bar
- Click Clear host cache
- Then go to chrome://net-internals/#sockets
- Click Flush socket pools
- Restart Chrome
For Website Owners: Server-Side Solutions
If you own the website that’s showing this error, the problem might be on your hosting end. I’ve dealt with this when migrating sites between hosting providers.
Check Your Domain Registration:
- Verify your domain hasn’t expired
- Ensure DNS records are properly configured
- Check nameserver settings with your domain registrar
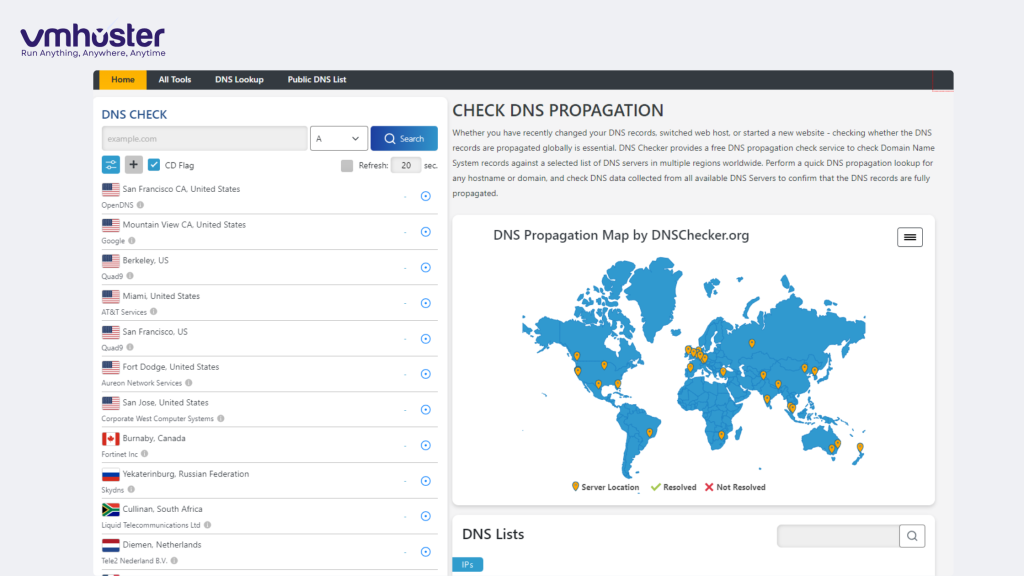
Verify DNS Records:
Use online tools like DNSChecker.org or WhatsMyDNS.net to verify your domain’s DNS propagation globally.
Common DNS Record Issues:
- Missing A records pointing to your server IP
- Incorrect nameservers after hosting migration
- DNS propagation delays (can take 24-48 hours)
If you’ve recently changed hosting providers, remember that DNS changes don’t happen instantly. When I moved one of my sites to a new hosting provider, it took about 6 hours for the changes to fully propagate worldwide.
Advanced Troubleshooting
If none of the above methods worked, here are some advanced steps:
Check for Malware:
Run a full system scan with your antivirus software or use Malwarebytes (free version works fine).
Try Safe Mode with Networking (Windows):
- Restart your computer
- Press F8 during startup
- Select Safe Mode with Networking
- Try accessing the website
This helps identify if third-party software is causing the issue.
Use Alternative Browsers:
Sometimes the issue is browser-specific. Try accessing the website using:
- Microsoft Edge
- Firefox
- Safari
- Opera
If the site loads in a different browser, the problem is with your primary browser’s configuration.
Prevention Tips (So This Doesn’t Happen Again)
After fixing this issue multiple times, here’s what I do to prevent it:
- Use reliable public DNS servers like Cloudflare or Google DNS permanently
- Keep your system and drivers updated (enable automatic updates)
- Clear your browser cache regularly (at least once a month)
- Choose a reliable hosting provider with proper DNS infrastructure
- Monitor your domain expiration dates if you’re a website owner
- Use a quality antivirus that doesn’t overly restrict network access
When to Contact Your ISP or Hosting Provider
If you’ve tried everything above and still can’t resolve the issue:
- Contact your ISP if multiple websites show this error
- Contact your hosting provider if you own the website and suspect server-side issues
- Use mobile data as a temporary workaround (tether from your phone)
When I had persistent DNS issues last year, it turned out my ISP was having regional DNS server problems. A quick call confirmed the issue, and they resolved it within a few hours.
Final Thoughts
The DNS_PROBE_FINISHED_NXDOMAIN error looks scary, but it’s usually fixable within minutes. Start with the simple solutions—clearing your DNS cache and switching DNS servers solves most cases. If you’re a website owner dealing with this issue, ensure your hosting infrastructure is solid. I’ve had great experiences with reliable hosting providers that maintain proper DNS configurations and offer quick support when issues arise.